1. Type이 바뀐 할 일 목록을 새로고침 없이 Ajax 방식으로 구현
- 프로젝트를 진행할 땐 Ajax가 뭔지 감도 안오고 어떻게 구현해야 할지도 모르겠어서 XMLHttpRequest객체만 생성했다. 그리고 window.location.reload() 함수를 통해 화면을 새로고침해서 DB로부터 모든 할 일을 가져와서 전체적으로 화면을 재구성했다.
- 또한 GET 방식으로 데이터를 전송하는 방식은 보안상 안전하지 않기 때문에 서버와 POST방식으로 연결하도록 수정하였다.
- 가져올 자료와 구성할 컴포넌트가 몇 개 없다면 새로고침을 하는 방식이 ajax 방식과 속도 차이는 별로 나지 않을것이다.
- 하지만 화면에 컴포넌트와 DB 자료, 이미지 파일 등이 많다면 화면을 새로고침할 때 많은 시간이 걸릴것이다. 이럴땐 변경된 부분에 대해서만 화면이 바뀌는 Ajax 방식이 사용자 편의, 속도 측면에서 훨씬 좋은 방법이다.
- 따라서 프로젝트를 완성하고나서 Ajax 방식으로 바꾸기 위해 프로젝트를 리팩토링하였다.
- 구글에 검색하면 거의 JQuery를 사용하여 Ajax를 구현했지만 이번 프로젝트에서는 순수 javascript로만 구현했다.
2. Ajax 방식
- Ajax 공부하기 : https://developer.mozilla.org/ko/docs/Web/API/XMLHttpRequest
XMLHttpRequest
XMLHttpRequest 는 이름으로만 봐서는 XML 만 받아올 수 있을 것 같아 보이지만, 모든 종류의 데이터를 받아오는데 사용할 수 있습니다. 또한 HTTP 이외의 프로토콜도 지원합니다(file 과 ftp 포함).
developer.mozilla.org
3. Javascript와 Servlet 코드 리팩토링
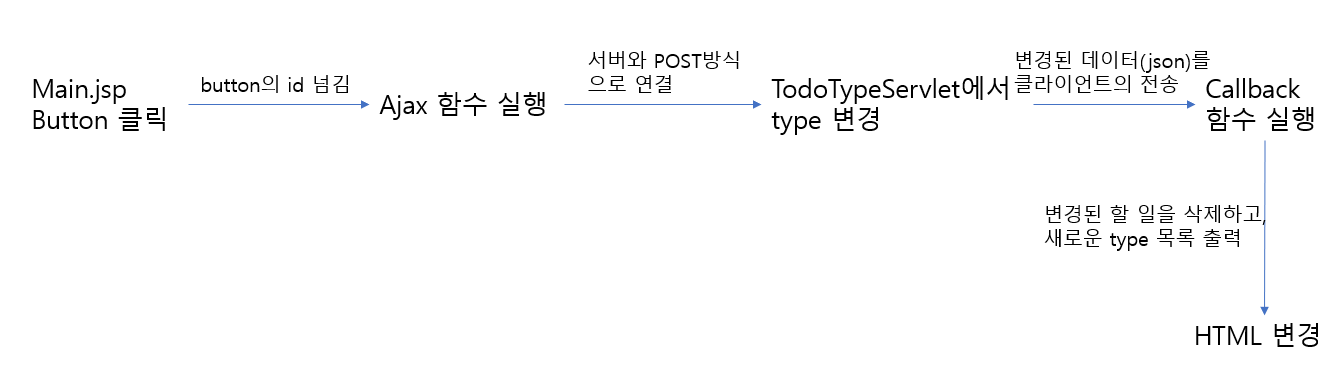
3-1. 구현 방식
3-2. main.js :
function next(bid){
    // button id = id#type을 #으로 split하여 할 일의 id와 type을 추출한다.
    var buttonInfo = bid.split('#');
    var type = buttonInfo[1];
    var id = buttonInfo[0];

    // 클라이언트와 서버의 비동기 통신(Ajax)를 위해 XMLHttpRequest 객체를 생성한다.
	var oReq = new XMLHttpRequest();

	// XMLHttpRequest의 이벤트 리스너에 콜백 함수를 구현하여 스택에 있는 함수들이 모두 실행된 후
	// 가장 마지막에 실행되도록 한다.
	oReq.addEventListener("load", function() {
		// request가 끝나고 response가 준비된 상태일 때 콜백 함수를 실행시키기 위해 조건문을 추가한다.
		if (oReq.readyState === XMLHttpRequest.DONE) {
			// status 프로퍼티는 서버의 문서 상태를 나타낸다.
			// status가 200이면 서버에 문서가 존재함을 나타낸다.
			if (oReq.status === 200){
				// Type이 변경된 할 일은 삭제한다.
				var targetButton = document.getElementById(bid);
				var target = targetButton.parentElement;
				var targetParent = target.parentElement;

				targetParent.removeChild(target);

				// TodoTypeServlet에서 변경된 할 일 목록을 받음
				var json = this.responseText;
				json = JSON.parse(json);

				// 변경된 데이터(json)로 HTML을 업로드 함.
				var newSection = null;
				var msg = "";
				for(value in json){
					var todo = json[value];
					var type = todo['type'];

					newSection = document.getElementById(type);
					newSection.innerHTML = "<p class='title'>" + type + "</p>";

					if(type === "DOING"){
						msg += "<section class='content'>" +
						"<p class='content-title'>" + todo['title'] + "</p>" +
						"<p class='content-data'>" + "등록날짜 : " + todo['regDate'] +", "+ todo['name'] + " 우선순위 : " + todo['sequence'] + "</p>" +
						"<button id=" + "'" + todo['id'] + "#" + todo['type'] + "'"+ "class='nextType' onclick='next(id)'>-></button>" +
						"</section>";
					}
					else{
						msg += "<section class='content'>" +
						"<p class='content-title'>" + todo['title'] + "</p>" +
						"<p class='content-data'>" + "등록날짜 : " + todo['regDate'] +", "+ todo['name'] + " 우선순위 : " + todo['sequence'] + "</p>" +
						"<button id=" + "'" + todo['id'] + "#" + todo['type'] + "'"+ "class='nextType' onclick='buttonDelete(id)'>X</button>" +
						"</section>";
					}
				}
				newSection.innerHTML += msg;
			}
			else{
				console.log("fail");
			}
		}
	});

	// 서버와 클라이언트를 POST 방식으로 연결
	oReq.open("POST", "http://localhost:8080/TodoList/TodoTypeServlet", true);
	// 전송할 데이터의 타입을 설정
	oReq.setRequestHeader('Content-Type', 'application/x-www-form-urlencoded');
	// 서버에 데이터 전송
	oReq.send("type=" + type + "&id=" + id);
}

function buttonDelete(bid){
    var buttonInfo = bid.split('#');
    var type = buttonInfo[1];
    var id = buttonInfo[0];

	var oReq = new XMLHttpRequest();
	oReq.addEventListener("load", function() {
		if (oReq.readyState === XMLHttpRequest.DONE) {
			if (oReq.status === 200){
				// Type 변경된 할 일은 삭제한다.
				var targetButton = document.getElementById(bid);
				var target = targetButton.parentElement;
				var targetParent = target.parentElement;

				targetParent.removeChild(target);
			}
		}
	});

	oReq.open("POST", "http://localhost:8080/TodoList/TodoDeleteServlet");
	oReq.setRequestHeader('Content-Type', 'application/x-www-form-urlencoded');
	oReq.send("type=" + type + "&id=" + id);
}
3-3. TodoTypeServlet :
	protected void doGet(HttpServletRequest request, HttpServletResponse response) throws ServletException, IOException {
	}

	@Override
	protected void doPost(HttpServletRequest request, HttpServletResponse response) throws ServletException, IOException {
		doGet(request, response);
		response.setCharacterEncoding("utf-8");
		// 응답으로 보낼 데이터 타입을 json으로 설정
		response.setContentType("application/json");

		// 클라이언트에서 보낸 데이터를 받음
		Long id = Long.parseLong(request.getParameter("id"));
		String type = request.getParameter("type");

		// id와 일치하는 할 일의 type을 변경
		TodoDao dao = new TodoDao();
		dao.updateTodo(id);

		List<TodoDto> list = dao.getTodos();
		List<TodoDto> jsonList = new ArrayList<TodoDto>();

		// 변경된 할 일 목록을 list에 저장
		for(TodoDto dto : list) {
			if(type.equals("TODO") && dto.getType().equals("DOING")) {
				jsonList.add(dto);
			}
			else if(type.equals("DOING") && dto.getType().equals("DONE")) {
				jsonList.add(dto);
			}
		}

		// list를 json형식으로 변경하기 위해 ObjectMapper 객체 생성
		ObjectMapper ob = new ObjectMapper();
		String json = ob.writeValueAsString(jsonList);

		// json 파일을 전송
		PrintWriter out = response.getWriter();
		out.println(json);
		out.close();
	}
3-4. TodoDeleteServlet :
	protected void doGet(HttpServletRequest request, HttpServletResponse response) throws ServletException, IOException {
	}

	@Override
	protected void doPost(HttpServletRequest request, HttpServletResponse response) throws ServletException, IOException {
		doGet(request, response);

		TodoDao dao = new TodoDao();
		Long id = Long.parseLong(request.getParameter("id"));
		dao.deleteTodo(id);
	}
4. 느낀점
- Java 백엔드 개발자는 Java, Spring만 알면 된다고 생각했다. 하지만 요즘 웹 애플리케이션은 거의 Ajax방식으로 구현되어 있다.
- Java, Spring만 안다고 Ajax를 구현할 수는 없다. 백엔드 개발자여도 Javascript(클라이언트)를 잘 알아야 더 좋은 백엔드 개발자가 될 수 있다는걸 느끼는 계기가 되었다.
- 앞으로 프로젝트를 끝내더라도 더 개선할 수 있는 부분을 생각하는 개발자가 되어야겠다.
'Project > Todo-List(Servelt, JSP)' 카테고리의 다른 글
| 5. 프로젝트 마무리 (0) | 2020.08.13 |
|---|---|
| 4. 할 일 Type 변경 및 삭제 (0) | 2020.08.13 |
| 3. 할 일 등록 구현 하기 (0) | 2020.08.13 |
| 2. Main 화면 구현 (0) | 2020.08.13 |
| 1. Modeling & Table, Model 만들기 (0) | 2020.08.13 |


